measuring reaction time

We measured people’s reaction time in class today using this BBC site.  Click on the picture to try again at home.

It is important to consider reactions when we measure short times.  In Physics, we often try to avoid reaction times affecting our results by using data loggers and light gates to take accurate time measurements.

Read about using light gates to measure average speed and instantaneous speed on pages 6 & 8 of your Transport booklets.

S3 snow day work

I have uploaded a set of notes on the Using Electricity unit.  Please click on the download link below and save a copy on your computer at home.  I would like everyone to read up to the end of page 19.  This will cover everything that we have looked at so far on this topic.

Please try to answer as many of the questions in these notes as you can, either by printing out the pages and writing in the spaces or using your Physics jotter.

You may leave a comment if you get stuck with anything and I will try to help.

snow day work for S4

If you can’t get to school due to the weather, here is some work for you to do at home.  We will start the Transport topic when we have finished our Investigations.  Please use these notes to begin looking at the Transport unit.

Read the notes on average and instantaneous speed and try the questions.  If you have a printer at home, please also try to print out the pages with squared sections to practice drawing speed-time graphs.

Click on the download link below to get the file – you will need Adobe Acrobat Reader.

Snow day work for S3

If you can’t get to school due to the snow, here is some physics work so that you can keep up with the course.

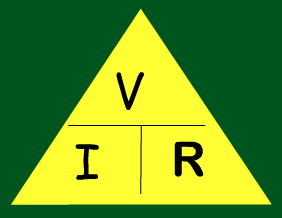
We started looking at Ohm’s Law last week. Go to the HelpMyPhysics site and try the Ohm’s Law activities there.  I have also uploaded some additional problems taken from our classroom booklets. Click on the download link below to get your copy.  You can leave a comment here if you get stuck or want to ask a question.

half life calculations

The activity of all radioactive substances decreases over time.  The time it takes for the activity of a material to reduce by half is called the half life of the material.  Radioactivity is a random process.  We don’t know which atom will be the next one to decay – a bit like we don’t know which piece of popcorn will be the next one to pop.
However, we do know the time it takes for half of the atoms in a radioisotope to decay – this is our definition of half life.
These notes will show you how to do different types of half life calculations. The maths is straightforward – just make sure you can multiply and divide by 2!
There are 6 different problems to try as you read through the notes, answers are provided on the last page.


radiotherapy

Radiotherapy is one method doctors can use to treat cancer.  Radiotherapy can be performed without surgery and avoids the side effects that a patient may experience during chemotherapy.

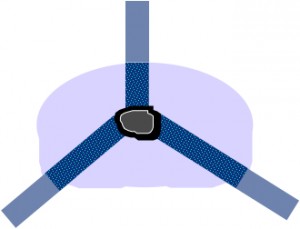
In the most common form of radiotherapy, high energy x-rays are used to kill the cells in the tumour.  The treatment must be planned carefully to make sure that healthy cells are not damaged by the x-rays.  The dose required to kill the cancerous cells is normally delivered in smaller doses and at different angles (as shown in the diagram) to make sure that only the cells in the tumour are destroyed.

  • Each beam delivers one third of the dose required.
  • The beams overlap at the tumour, which receives the full dose.

Here are some slides about radiotheraphy.  I have attached a copy of them (as a pdf file) to the bottom of this post.

Radiotherapy

X-rays

X-rays are a form of electromagnetic radiation.  They have a much higher frequency than visible light or ultraviolet.  The diagram below, taken from Wikipedia, shows where x-rays fit into the electromagnetic spectrum.

image by Materialscientist

Wilhelm Röntgen discovered x-rays and the image below is the first x-ray image ever taken.  It shows Mrs. Röntgen’s hand and wedding ring.  The x-ray source used by Röntgen was quite weak, so his wife had to hold her hand still for about 15 minutes to expose the film.  Can you imagine waiting that long nowadays?
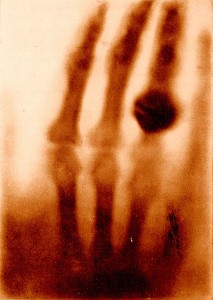
This was the first time anyone had seen inside a human body without cutting it open.  Poor Mrs. Röntgen was so alarmed by the sight of the image made by her husband that she cried out “I have seen my death!” Or, since she was in Germany, it might have been “Ich habe meinen Tod gesehen!” that she actually said.

Röntgen continued to work on x-rays until he was able to produce better images. The x-ray below was taken about a year after the first x-ray and you can see the improvements in quality.
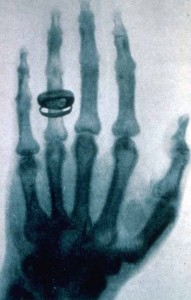
Notice that these early x-rays are the opposite of what we would expect to see today. They show dark bones on a lighter background while we are used to seeing white bones on a dark background, such as the x-ray shown below.  The difference is due to the processing the film has received after being exposed to x-rays.
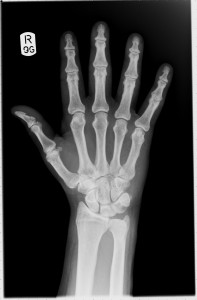
In hospitals, x-rays expose a film which is then developed and viewed with bright light.  X-rays are able to travel through soft body tissue and the film behind receives a large exposure.  The x-rays darken the film. More dense structures such as bone, metal fillings in teeth, artificial hip/knee joints, etc. block the path of x-rays and prevent them from reaching the film.  Unexposed regions of the film remain light in colour.

Röntgen’s x-ray films would have involved additional processing steps.  The exposed films were developed and used to create a positive.  In creating a positive, light areas become dark and dark areas become light.  So the light and dark areas in Röntgen’s x-rays are the opposite of what we see today.  Our modern method makes it easier to detect issues in the bones as they are the lighter areas.

Röntgen was awarded the first ever Nobel Prize for Physics in 1901 for his pioneering work in this field of physics.

Medical imaging has come a long way since Röntgen’s discovery of x-rays.  This promotional video from German company Siemens outlines the advances that have been made since the early 20th century.

I have attached a recording of a short BBC radio programme about the first x-ray and what people in the Victorian era thought of these new images.  Click on the player at the end of this post or listen to it in iTunes.

4.3 – How to draw ray diagrams

I set you a task at the start of the week.  You were asked to complete a ray diagram at home and use 3 words to describe the image that was formed.

Here are 2 short videos to remind you how to draw a ray diagram.  The first video is an introduction to ray diagrams.

how to draw a ray diagram from mr mackenzie on Vimeo.

The second video looks at a ray diagram when the object is less than one focal length away from the lens.

ray diagram for objects closer than 1f from mr mackenzie on Vimeo.

Once the ray diagram is complete, we need to describe the image that has been formed.  The description must tell us about the size, orientation and type of image that is formed.

Size
If the image is larger then the original object, we say the image is magnified
If the image is smaller than the original object, we say the image is diminished.

Orientation
If the image is the same way up as the object, we describe it is upright.
If the image is upside down compared to the object, we describe it as inverted.

Type
If the object and image are on opposite sides of the lens, it is a real image.
If the object and image are on the same side of the lens, it is a virtual image.